Sunday 26 February 2012

Build Day 53


Build time today 3.0 hours - Total build time 144.0 hours.
Man time today 3.0 hours - Total man time 165.0 hours.

Bracket held in place by a
pipe off-cut
I hoped to get the body work on, but before I was going to try I wanted to fabricate a bracket to hold the fuel tank breather pipe secure, where it passes the roll bar mount it is loose and though I have it protectively wrapped it is still likely to vibrate and cause a resonance through the fuel tank. I made a small bracket from aluminium plate that will be secured when the roll bar is fitted, it has as a cable tie anchor riveted to it and will hold the breather pipe secure.

Before attaching the bodywork I thought I would check the measurements and found that based upon the measurements I had taken it would not fit, the internal measurement where the rear panel fits over the back of the cockpit is 1013mm but measuring the body work it is just under 1020. I think rather then trying and possibly damaging the body work I would get some guidance from the helpful people at Westfield. 
I even managed to get the body work stored at the rear of the garage so that my wife could still get her car in.

This left me at a bit of a loose end so I decided to have a go at carbon fibre wrapping one of the wing mirrors, these are one area of the car that has some room for improvement (my my opinion anyway) and I thought until something more permanent, like different mirrors, carbon wrapping seemed to be a resonable short term solution.
Doing the mirror was a little easier than the pedal cover but still far from straight forward. I used my workbench to clamp the mirror in so that I could use both hands while balancing my wife's hair dryer on a block of wood. The result though not 100 percent perfect is not bad, I am sure with practice I would get better.


Build Day 52


Build time today 5.0 hours - Total build time 141.0 hours.
Man time today 6.0 hours - Total man time 162.0 hours.

A Day spent assembling the body off the car.

I first laid out dust sheets etc on the floor to protect the panels then carefully lined the panels up and clamped them in place. There were a couple of areas where there was excess fibre glass to be removed. I used a fine file and/or wet and dry to smooth these areas down.
Once every thing was lined up as well as possible I carefully drilled and used the supplied M6 nuts and bolts together with the 25mm washers to fasten together. I had to square some of the washers off to get them to fit.
The finished result is not bad but far from perfect, there are several places where there are raised edges where the panels butt together that despite my best efforts I could not get to line up. Not sure if this is normal of not or if something can be done about it. The next step is to lift the bodywork in to place. This is not likely to be a quite process and will require several pairs of hands. So needs to be left until tomorrow.


Monday 20 February 2012

Build Day 51


Build time today 3.0 hours - Total build time 136.0 hours.
Man time today 3.0 hours - Total man time 154.0 hours.

Until I have the rear wing back and enough time there only so many jobs I can tackle, the first for the day was to label the fuses. The car does not have a glove box or manual and I did not want to be stuck somewhere with a blown fuse and no idea which one needs to be changed without inspecting them all. There are also a couple that live under the dash that I will label.


I then decided to have a go at carbon fibre wrapping, planning to start with the pedal cover and then move on the the wing mirrors, I did not get on to the wing mirrors as covering the pedal cover took considerably longer than expected.  The finished job is OK ( I think) but far from perfect, the problem was getting the wrap to stretch and then stick around the area the steering column runs.
I may make sure that when I do the mirrors I lightly sand them first so I have a better surface for the wrap to bond to, a little more research may be needed.


Build Day 50


Build time today 4.0 hours - Total build time 133.0 hours.
Man time today 4.0 hours - Total man time 151.0 hours.

I first completed the oil catch can assembly, the supporting bracket I had attached used a couple of rivet nuts to mount to the chassis, as I had had some issues with rivet nuts in the past not being as secure as I thought I decided to add a nut and bolt to secure the bracket more securely and added an M8 bolt inserted through the chassis rail. Once this was in place I mounted the catch can and routed the pipes to the crank case and cam cover outlets. I used a securing point on the intake manifold and the exiting point I had created for the clutch cable to hold the pipes in place and away from the ancillary belts.


I then decided to have a go at assembling the dash, so collected the clocks and switches together with the rest of the electrical items. There is not really very much info on what is needed and I guess there is no fixed order for the switches and clocks. The holes for the clocks and larger switches are already cut and ready the smaller switches and warning lights have cut outs in the back plate but not in the cover so I needed to carefully cut a hole for the warning lights.
When I checked through the warning lights and small switches I found I had more of these than suitable holes in the back plate, I will have a look at the demo car to check where they have theirs located before finishing off plus I have two heater switches but no hazard switch so need to pop in to swap them.


Build day 49


Build time today 1.0 hours - Total build time 129.0 hours.
Man time today 1.0 hours - Total man time 147.0 hours.

Only spent a little time today,  I had ordered an 8mm straight pipe coupler which I wanted to use to connect the existing crank case breather pipe to the new 8mm pipe I was using to connect to the oil catch can. I was using the existing pipe as this reduced from 13mm to 8mm. Using this and some cable wrap I finished assembling the oil catch can ready for installation.
I also fitted the number plate light to the rear body work section, meaning that all the wiring in this area were complete and the section was ready to mount.   

Sunday 19 February 2012

build day 48


Build time today 5.0 hours - Total build time 133.0 hours.
Man time today 5.0 hours - Total man time 151.0 hours.

Started the day by tackling the exhaust outlet in the side panel, A job that made me somewhat nervous. Using the guide supplied I carefully marked out where the hole needed to be cut. (I have added the measurements to the first picture) I measured three or four times to be sure. I then thought about the best method of cutting the hole. The advice was to cut a hole in each corner (with a hole cutter if I had one) and then either using a hacksaw blade or Dremel type tool finish the cut. I first cur a hole in the centre to make sure that it would not split or cause excessive chipping before cutting each corner, trimming the excess and then sanding smooth.


Initially I thought the hole looked a little larger but once the side panel is in place I realized that it needed to be like that to allow room for the exhaust to be positioned.


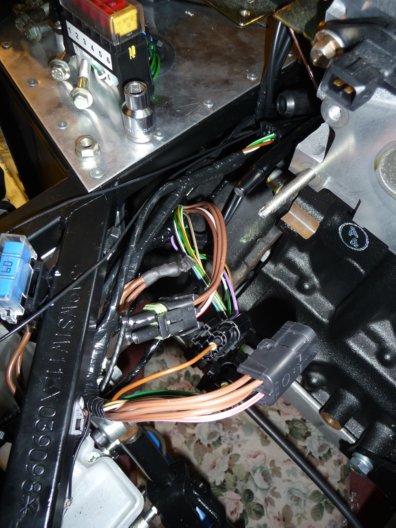
I then proceed to look at completing the coolant pipe fitting and worked out where to secure the non-flexible pipes. I had been supplied with two spacers but wanted an additional spacer to allow the pipes to be secured at both ends, plus could not find any screws or bolts suitable. I had rivet nuts so decided to ask when I visited Westfield next.

As I was working in that area I then had a look at how the heater fitted, so hunted out the various bits and pieces, the holes are already drilled in the top scuttle so I lined up the heater with the holes and checked how the attached pipes fitted, both seemed a little long so I measured and trimmed to make them fit better. In doing this I also realize that I had been given an excess item. bonded on to the bottom of the top scuttle is a black fibreglass section used to duct hot air to the windscreen (you can see one of the inlets in the picture). Even though this was fitted (thank god) I also had the item so decided to return it. I had also noticed I had a number plate mounting which I assumed was surplus to requirements so decided this could also be returned.

I decided as I needed a couple of items and had some to return another visit was in order. So armed with my items to return and a small shopping list I visited the helpful people at Westfield again.  They accepted the returned heater outlet saying that it used to be a requirement to fit oneself and still is on some kits. But I would need the number plate fitting for the IVA test, the regulations now say that a full side number plat fitting is required that allows for the GB Euro identifier. I picked up an extra spacer and a couple of M6 bolts to attach the coolant pipes to the chassis.
Armed with this parts I then set about fully securing the coolant pipes. I had decided to fasten the larger pipe to the diagonal cross chassis braces front and rear, the small pipe could be secured at the same point at the rear but needed to be secured to the vertical plane of the chassis rail at the front, drilling the hole and securing a rivet nut for this mount point took a lot of time, I wanted to be sure to firmly mount the pipe hear using a spacer to help keep the flexible pipe away from the block securing the front anti-roll bar.

I finished the day by drilling the pedal cover and filling off the raised lettering on the wing mirrors so I could apply some carbon fibre wrap I have purchased.

Build Day 47


Build time today 5.0 hours - Total build time 128.0 hours.
Man time today 5.0 hours - Total man time 146.0 hours.

A longish day without that much to show for it.
I knew I was at the point I needed to start to consider fitting the body panels, to finish the coolant pipes I needed to put the scuttle panel in place, to know where that went I needed the side panels ...


I fetched the side panels from the bedroom and worked out how they fitted, basically they clip over the side of the cock pit area and then the bottoms fit flush under the car, it is a tight fit and I needed to use a couple of flat headed screw drivers to easy the bottom under the car.I knew I needed to cut an exhaust outlet in the passenger side panel so had a go at creating a template using card and masking tape.  Taping up was straight forward but getting the exhaust back out was not possible so ended up giving up deciding to come back to it later.


With the side panels in place, I could work out where the scuttle sat and therefore understood what pipe lengths were needed to attach tot he heater unit, two identical pipes are supplied neither of which is an exact fit, they have to be cut to suit and I wanted to be sure of exactly what was needed before I started to cut. Once the scuttle was in place it was easy to see what was needed where and therefore where I could make cuts. Assembling the coolant pipe work was a simple process after that. the pipes were quickly cut and everything assembled, bar those that attached to the heater and header tank as the scuttle needs to be secured before they can be attached. I secured the smaller diameter pipe to the aluminium scuttle panel by unscrewing a couple of the mounting screws (glad I had not riveted but used rivet nuts) This still left the larger pipe unsecured and the smaller floating at the other end. I was not total sure how to fix in place but had some ideas, in the bad of bits associated with the coolant system were a couple of spacers I just needed to work out the best places to locate them.
I also had a problem with the instructions/guide I had, it says to use an M5 tap on the radiator expansion point and then use an M5 screw to block the hole. The M5 tap felt very loose and when an M5 screw was inserted it could be pulled out, I thought an M6 screw felt more secure, but decided to confirm with Westfield.

I then spent some time looking at how the body assembled, the build guide is not clear and I could not seem to get the rear and left and right side panels in place. there was just not enough room.
Plus the guide explained that an aluminium panel needs to be fitted to the underside of the car at the rear to support the rear or the rear panel. Again the guide was far from clear the picture was not really of the correct area. I then fetched the rear wings to see if having them would help inspire, trouble was when I examined one of the wings I found a chip.

I decided a visit was called for, I could confirm the correct screw size for the radiator and if M6 pick one up, get some advice on cutting the exhaust hole and some general advice on fitting the body together, plus ask how best to treat the chip.
I was initially told that M5 was correct but they got a radiator out to check and it looks like there has been a change and M6 is now the correct fitting. They supplied a template guide for cutting the body work for the Zetec exhaust and the recommendation was that the body work should be assembled off the car and fastened to together, any trimming required should be done carefully with a fine file. using the sides, rear and arches it should be possible to get it all lined up and secured. The chip could be fixed using gel filler and I let the wing with them.
Armed with this info I returned home and started to look at the body work fitting. I could only look so far as I did not have both rear wings but could see that a little filling was needed to get the rear and sides lined up. I decided to leave the body work for the time being as it was a two man job, I did not have both rear wings and once started really needed to be finished.
I finished the day by completing fitting the plugs to the rear lights. I re-looked at the one fitted last time as I was not happy and eventually got it to the point where it all seemed to fit correctly, once this was done fitting the other rear light was slightly easier. Hopefully the fronts will be easier still.

Tuesday 14 February 2012

Build Day 46


Build time today 2.5 hours - Total build time 123.0 hours.
Man time today 4.0 hours - Total man time 141.0 hours.

Oil did a fair amount by himself, preparing for the side panels to be fitted, I now had some more sealant so he completed the task of sealing the inside section of the foot wells, there are a couple of areas that have largish gaps that need to be sealed to stop water ingress.

Once this was done it was a joint task to get the side panels on and riveted, having not done any panels for quite a while I had forgotten just how many rivets are used and how long it takes.


Once the sides were on I then spent a little more time on the rear lights completing one of the stop, indicator and tail units. This took a lot longer than I expected as getting the connectors in place to allow everything to fit together took me quite a while, I am still not convinced it is correct but will wait to see how it all connects together.

Build Day 45


Build time today 1.0 hours - Total build time 120.5 hours.
Man time today 1.0 hours - Total man time 137.0 hours.

Managed to get an hour and decided to start adding the connector blocks for the rear lights. I had more details from Westfield as to which wires went where. It should not be a difficult task but fitting the connector blocks is actually quick tricky, or I just have not got the knack yet. I completed the reverse and fog lights before starting on the indicator, tail and stop light connectors.
To make this neater I decided to route the wires from the LED tail lights through the trunking attached to the indicator light. I will then join the earth wires and trim to the same length before fitting the connector terminal.

A job to tackle when I have a spare half an hour in the future.


Build Day 44


Build time today 4.0 hours - Total build time 119.5 hours.
Man time today 4.0 hours - Total man time 136.0 hours.

Not totally sure what needs to be done next but I know there are various tasks that need to be completed to allow me to fully progress to fitting the body, complete the panelling (sides and transmission tunnel), make sure the panels are water tight, make a template for the exhaust outlet, fit the washer bottle, make more adjustments to the top scuttle, fit more of the coolant system...
I decided that I needed to get the panelling completed, so after fitting the panels to the top of the transmission tunnel (except the handbrake cover, just in case it needs some more adjustment). I then removed the film and tidied up the passenger area ready to make it water tight only to then run out of silicon sealant. I needed to get some more sealant before continuing so moved on to another task.
I spent more time arranging the coolant pipes but until the scuttle body panel is in place I know I can't complete fitting them so the only real progress I made was to attach the lower aluminium pipe to the chassis using a rivet nut and large P-clip.

It was then on to the washer bottle, the connector block on the harness is not the correct one for the supplied bottle so needed to be removed and new terminals added. While changing the connector terminals I shorted the wire to remove any unnecessary excess.


I then decided to have a go at making a bracket for the the oil catch can purchased off eBay, after a good degree of pondering I decided that the best place to fit was in front of the engine as there is plenty of space and reasonable access when needed. I decided to fabricate a bracket to fit to the chassis cross brace in front of the engine.  I cut two pieces of aluminium and bent the edges and riveting the corners to give it the necessary rigidity before attaching to the chassis using a couple of rivet nuts. It feels sturdy and is ready to have the tank attached once I have the necessary pipes.


To finish off for the day I made a further modification to the scuttle, it was fouling the engine management harness where it passes through the scuttle panel. I trimmed the return edge off the scuttle, though I suspect I may need to trim further. But I need to see where the panel will ultimately fit first which means the side panels need to be in place.


Monday 13 February 2012

Build Day 43


Build time today 1.0 hours - Total build time 115.5 hours.
Man time today 1.0 hours - Total man time 132.0 hours.

Coolant system
cut top scuttle to fit around steering column

Onto the coolant system, I spent a little time working out where bits went but decided that I need to get the scuttle in place as a number of pipes are dependant on its position. Trouble was, like most things, it was not straight forward, firstly to fit properly the sides need to be in place and it needs to be trimmed around the steering column.


I lined the scuttle with the steering column to get the position on the scuttle needed to be cut then worked out how high the cut needed to be made. I protected the area with masking tape and marked where it needed to be cut out. To trim I used a combination of diamond cutting disk and rotary sanding disk in my Dremel (copy) plus a standard drill bit. I have cut the hole with as little clearance as possible, I suspect I may need to trim a little more from the hole before final fitting.

Tuesday 7 February 2012

Build Day 42


Build time today 1.0 hours - Total build time 114.5 hours.
Man time today 1.0 hours - Total man time 131.0 hours.

Spent time bleeding the brakes again, having confirmed with Westfield that all the bleed nipples need to be bled. The basic sequence is to start at the furthest point bleeding the lower nipples before the upper nipples. 
So passenger rear lower outer; lower inner; upper outer then upper inner etc. The upper inners were difficult to get a bleed tube on and I ended up disconnecting the hand brake cable to allow access.
I had completed a circuit and seemed to be getting to pressure when I noticed  a suspicious puddle on the floor.  Idiot me had not tightened up one of the brake pipe line connectors where it splits at the rear and a right fiddle it was to tighten as it sits behind the fuel tank.
Once tightened I redid the bleeding pumped the pedal a bit and left it compressed so I can check them again.
    

Sunday 5 February 2012

Build Day 41


Build time today 2.0 hours - Total build time 113.5 hours.
Man time today 2.5 hours - Total man time 130.0 hours.

No pictures today, nothing much visible different.

Did not spend too much time today, to cold. I spent the early part of the day clearing snow from mine and my fathers drive. Then had a look at my daughters troublesome handsfree kit, it now seems to be working again having updated the software to the latest version. 

I first filled the gearbox with oil, a job I had been putting off, subconsciously I think, a little fiddly but not really taxing. Its a good job I had cut the access hole in the inner passenger foot well though. I removed the bolt from the fill hole and then using the flexible funnel filled the gear box with oil. Once on to the second litre I took it a little more cautiously as I did not want oil every where. I had spread some plastic and news papers under the area to catch any excess, this did help. Once oil started to spill I quickly removed the funnel and inserted the plug, and mopped up any spilled oil. Once complete I secured the cover I had made having applied a little sealant.  

Next I started on the brakes, this was a job I was not particularly looking forward to having ready quite a few blogs that reported how tricky it was, again a job I had been avoiding. I had purchased a brake bleed tube with a non-return valve from eBay which I hopped would make the job a little easier (it did).
I starting with the wheel furthest from the master cylinder. The rear brake calipers have four bleed nipples on them and I a not totally sure if you need to bleed all four, for the moment I have just used the outer two, (top and bottom). The fronts have two on the upper side so I used both of these. (I think another email for confirmation to Westfield is needed)
So far I have been round twice leaving the pedal depressed while waiting on each until the bubbles stopped. It was a bit of a laborious task by my self because you need to be able to see the pipe while pressing the pedal which is not all ways that easy, once Oli came out it was a little easier. To keep the pedal compressed I used a quick clamp, set to spread rather than clamp, I have left it depressed and will have another go tomorrow.

Saturday 4 February 2012

Build Day 40


Build time today 3.0 hours - Total build time 111.5 hours.
Man time today 3.0 hours - Total man time 127.5 hours.

Yet more time spent on the wiring. The wire entry point for the engine management loom to behind the dash needed attention. There is no supplied dung/grommet for this and Westfield recommendation had been to tape over the hole.  I decided on a different approach. I first put some plastic ducting around the wires to protect them from rubbing against the panel edge then I set about making a plat to fit snugly around the ducting. To achieve this I cut a square from some spare aluminium panel and then drilling a hole in the centre as close to the size of the duct as possible. I then cut the panel in two so that it could be fitted around the duct. For extra protection I used a couple of standard house wiring grommets cut and glued to each half of the plate. To secure the plate I used rivet nuts inserted in the top scuttle panel and a little silicon sealant for extra protection.


Next on to securing the relays and engine management control box, rather than just using Velcro I decided to use screws and nuts for the relays and an aluminium securing strap for the control module.  To minimize the intrusion into the passenger area the screw heads are on the lower side of the panel. I also needed to trim the excess thread from the screws holding the relays as they were fouling the relay preventing it being replaced.
I added a couple of cable tie anchors to the trailing edge of the scuttle panel. I did not need to drill any new holes as they could be held by the existing screws.


To finish for the day I decided to complete the fuel system, and re-attach air intake pipe. I carefully routed the pipe and cut to length, covered with split trunking before securing in place.
I had noticed on the Westfield demo car that the fuel lines were secured to to a mounting point on the air induction system, which is what I have also done using a couple of cable tie anchors and an M5 screw.

The water system is next, I understand where every thing is routed but one of the fixed aluminium pipes fouls the front anti roll bar, I have checked with Westfield and it needs to be bent slightly to avoid this. They said heat is needed and I need to be careful not to kink the pipe. I tried to heat up the pipe using a paint stripping heat gun,  I am not sure if this is enough and will get clarification before trying again.

Friday 3 February 2012

Build Day 39


Build time today 2.0 hours - Total build time 108.5 hours.
Man time today 2.0 hours - Total man time 125.5 hours.

More time spent on the wiring, firstly yo finish off by sorting out the remaining earth wires, these needed to be cut to length and ring terminals attached before being taped, cable wrapped and secured to the rivet nut inserted in readiness.
Once this was done I then made some final adjustments to get the cables lined up before using cable ties and the rivet attached mount points to secure in place. Getting at them, especially those in the transmission tunnel was not easy but they are now secured in place, I hope to he requisite standard required for IVA.

Wires secured and covered,
they just need the cable ties trimmed
A view of the wires from the transmission tunnel,
Very much neater than when I first started the tidy up opperation


I have still got to secure the engine management box etc and wires further forward in the engine bay but these tasks are for another day. I won't fasten up the remaining engine bay wiring until I need to so that it can be adjusted to suit when I do the front lights etc.

I then had a go at modifying the dip stick pipe. The supplied configuration fouls the exhaust manifold and the pipe needs to be bent to clear it. I had had a little mess in the past and was not sure how it was attached,, it does not seem to fit tightly but I checked with Westfield I was told it was secured with an O ring and could be pulled free. It was therefore a matter of pulling free and using a pipe bender to assist in re-shaping to miss the manifold. Once re-shaped the mounting bracket was no longer in the correct place so I made an extension bracket from an aluminium plate off cut. The pipe is now clear of the manifold, the down side is that getting the dip stick in and out requires quite a bit of fiddling, this is something I may have to come back to in the future to address.


Build Day 38 Part 2


Build time today 2.0 hours - Total build time 106.5 hours.
Man time today 2.0 hours - Total man time 123.5 hours.


I first re-assembled the lower steering column having got some longer bolts from Westfield. I really want to get the wiring tidies so I can secure and forget, I know this is an area that needs some diligence if you want to get through the IVA test so I hope to do it justice. The work previously done had almost got it to the point where I was satisfied, only time will tell what the IVA inspector with think though. The main area I was unhappy with was where the different looms connected where there are several individual unprotected wires.
Induction system removed

Getting at them with the engine in place wasdifficult so I decided to remove the air induction system to allow access. very simple to remove and put to one side. (though I had no intention of leaving it off for any length of time).
Once the induction system was out of the way I could get enough access to the wires to cable wrap and tidy them up.
I basically disconnected all the plugs and taped or cable wrapped all the loose unprotected wires before re-connecting the looms I carefully check the routing to make sure that it was as smooth as possible.


Wires taped and with cable wrap applied
the offending wires before action


Wires more or less in place and starting to be secured


Once the wires were taped or wrapped and more or less in place I re-attached the air intake system before finishing for the day. this left me a couple of earth cables to sort out and secure before I was hopefully ready to fully secure the main section of the wiring loom.

The wiring has taken quite a lot of time, had I understood exactly what needed to go where before the engine was installed it would have been much more straight forward, but without detailed knowledge knowing the correct amount of wire to leave loose and where exactly to route would have not been possible. Perhaps next time!!!


Thursday 2 February 2012

Build Day 38 Part 1


Build time today 0.5 hours - Total build time 104.5 hours.
Man time today 0.5 hours - Total man time 121.5 hours.

Westfield visited again today to look at the broken oil sensor plug, they had an idea how to rectify the issue without having to remove the engine. (See Build Day 31/32) The issue initial idea was to use a tap to fully thread the plug/sleeve so that the sender would then screw in. I would not be able to remove the sleeve but I guess that would not be too much of an issue. Trouble was that once the tap bit it started to screw the sleeve in more. It did prove the the sleeve was free though and therefore it should be possible to extract with the appropriate extractor, they said they would be back in ten minutes, so I left the garage open and went back in the house to put the kettle on and to continue working. Probably no more that 15 to 20 minutes later the door bell went again, they had returned and the sleeve had been removed. Problem resolved, I could now see what the issue was. I had never inspected the inside of the sleeve, I had just assumed that the oil pressure sender would screw fully in, in reality there was not a lot of thread, my false assumption together with the tightness of the fitting, plus the lack of specific details in the guide led to the breakage.
Westfield are sorting out a replacement, they said there are two types, the one I had plus one that does not required the sleeve, they would try and sort out the latter.
With this sorted I can progress with the knowledge that the engine won't have to come out again. (not during the build anyway).
I can't emphasis enough how helpful Westfield are when needed, in some-ways I expected the guide to be more detailed and I know that they are working on a much improved guide process, but I know that once completed the satisfaction and understanding will be all the greater.

Build Day 37


Build time today 2.0 hours - Total build time 104.0 hours.
Man time today 2.0 hours - Total man time 120.5 hours.

A productive evening, I have the screws I needed so completed the fitments of the gear lever gaiter and the rear lights

I swapped the temporary M4 counter sunk screws holding the securing ring for pan head screws and tightened the ring down. Once secure I then trimmed the excess rubber. The panel is ready to fit when access is no longer needed to the transmission tunnel.


Next on to the rear light clusters, I already had the holes drilled in the body work it was a matter of just attaching the units. The reflectors went straight on with no issues, as I was screwing in to plastic I applied a little nut lock to each screw before inserting to help secure them. Even having purchased 16mm screws they were a little long so I trimmed each by about 5mm before using them to secure the combined stop and tail light unit, otherwise I would have run to the bottom of the hole. Again I used a little nut lock to help secure the screws in place.
Before finishing for the evening I had a look at the wiring, the indicator, reverse and fog light had wires to be fitted, these fitted to the back of the unit and were reasonably obvious as to how to fit. looking at the wiring diagram and the wires at the back of the car it was a little less obvious. On each rear corner of the car there is a 6 (only 5 connections) way and 2 way connector block. Each had one black wire, which I assumed to be an earth. The two way connections I assumed to be the reversing and fog lamps (now confirmed by Westfield), I also noticed that there was a wire with the same colour combination in the main block on the other side of the car (this is for left hand drive cars). There was no indication as to which wire did what so will need to confirm with Westfield. (Details on what wires are what for the rear and front lights have now been supplied)