Friday, 7 September 2012

Post Registration 7

Times have moved on and the Summer (Ha) is almost over.

Upgradeitus has started. The car may be orange but it is still small, low to the ground and I want to be as visible as possible so I decided I wanted some daytime running lights (DRL) plus I noticed that there is no easy means of flashing the head lights so have tackled those issues, plus with so little protection I felt nervous leaving it anywhere so have fitted an immobiliser.
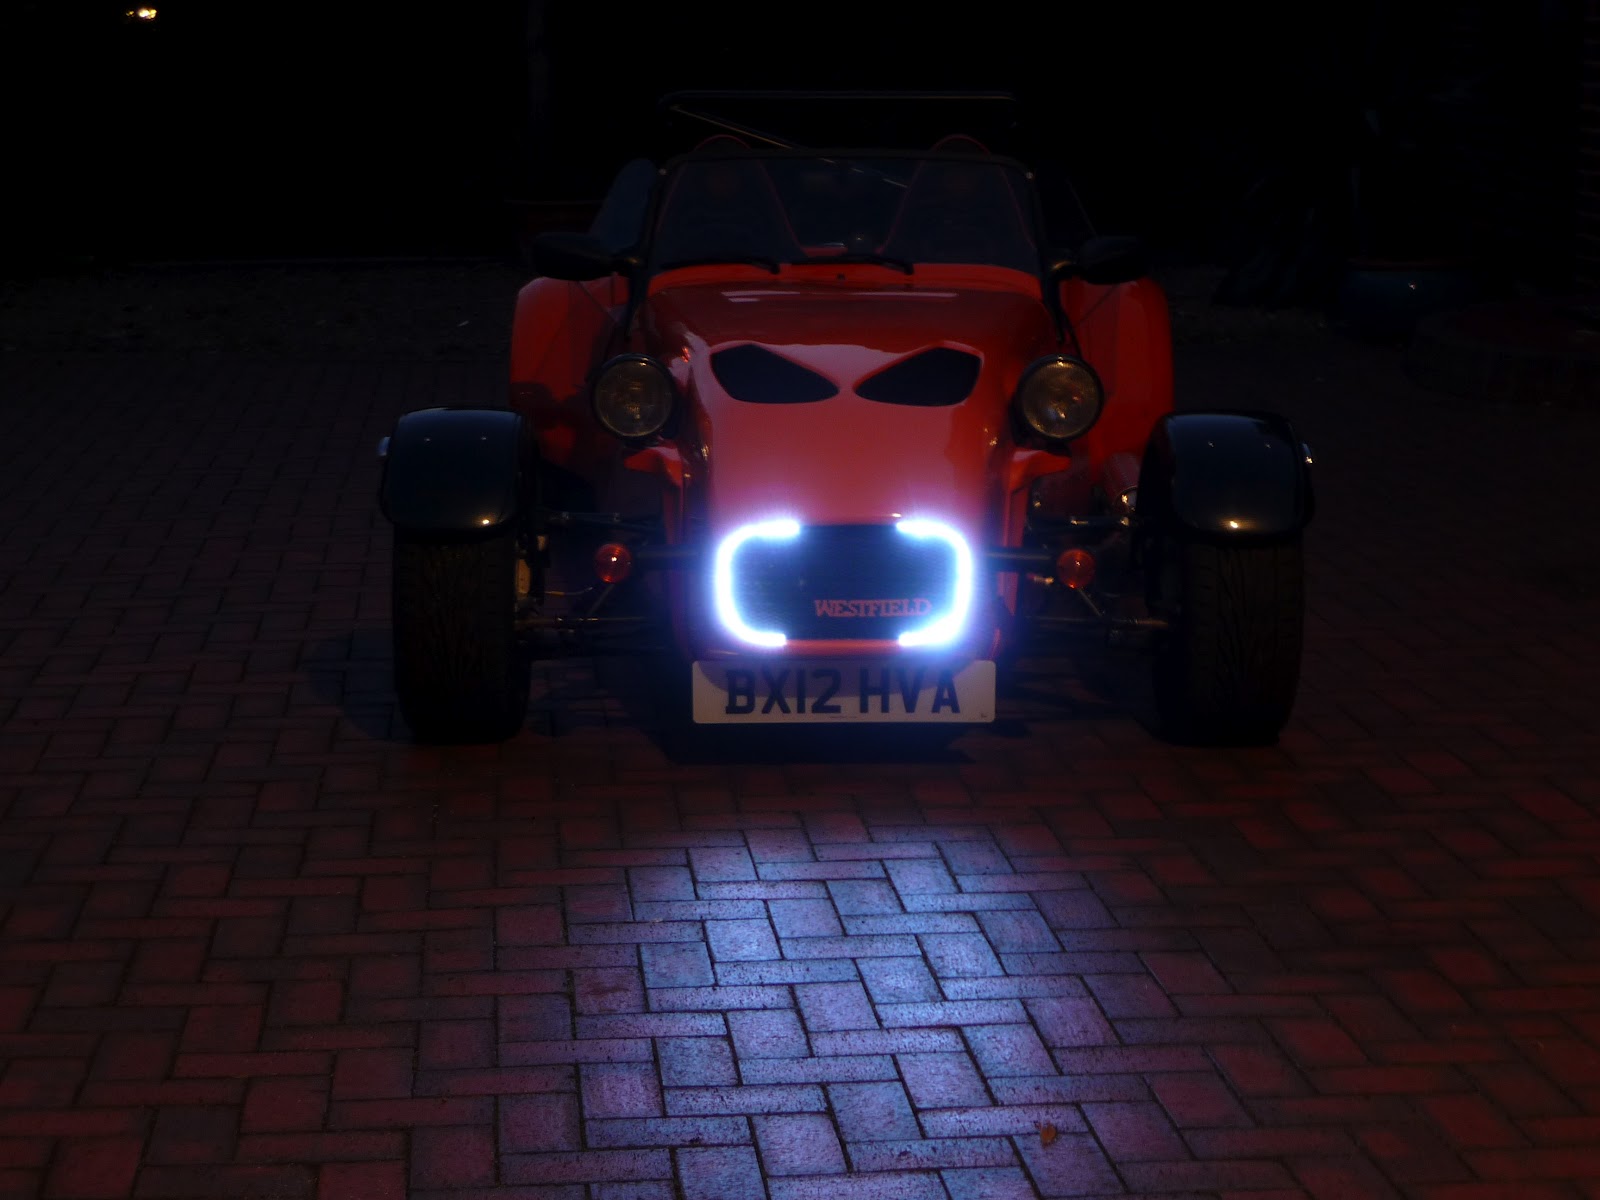
Deciding how to and where to fit DRLs took some thought, looking at what was available on eBay and other supplier. I finally spotted some flexible strips that were inexpensive and could be trimmed to length (£1.99 a length) I had initially thought about trying to fit them to the indicators in some fashion but when I actually had them in hand decided to fit them on the inner edge of the nose cone. Rather than just wiring them in I got a specific relay to control them, it dims them when the main head lights are on.
I think they are quite effective and have had some positive comments.


Tackling the lack of a headlight flasher turned out to be a straight forward task, I decided that I would use the button that currently works the heated screen, it is the momentary connection type and I is located on the dash in a suitable place.

I found that Maplin sold momentary connection switches with a built in light, it was therefore not too difficult to replace the headed screen indicator light with the combined switch and light and re wire the original switch to flash the headlights.  

I tackled the DRL, headlight flashing and immobilizer in one job while the dash was removed. It took a little longer than expected but I wanted to make sure that I routed cable carefully and selected the most appropriate places to modify or attach to the current wiring.


While away on holiday I managed to get the rear wheel arch removed and returned to Westfield so that the flaw that was present from the beginning could be rectified, it's now all sorted and the arch looks like it should.

The mileages is now above 1000 (more than halfway to being run in) so I have completed its second oil change, this time also changing the filter, it was not too difficult, though getting at the filter is not that easy as is very tight. I think I need a different type of tool though, I purchased one that uses a chain but being so tight with very little clearance above made it difficult, I think one of the other types will be better.

I have also managed to do a couple of longer runs, Oli and I went up to the Donington Kit Car show, the default route would have been almost all dual carriageway and motorway, I decided to steer clear of the motorway but still ended up on the A42, It was OK on this type of road but not its best environment, it was a generally good day and gave me a chance to look at more Westfields and buy some bits for more upgrades. We did just over 100 miles and it was all fine.

As the weather has been so nice this week we decided to go along to the Mid Wales and Shropshire area meet, I had spotted it on the calendar and could see that it was not to much further than one of the regular routes I take. It was a thoroughly enjoyable evening, we had not arrived long when the decision was made to go for a drive so we tagged along driving on some great roads. One issue though, we all managed to hit a small animal (we think a rabbit) trouble was it took my number plate off the front, I knew it was only a matter of time. (Sticky one now ordered to go on the nose cone). We did in the region of 120 miles in total and as I had also done a little running about since filling up the fuel gauge is reading very empty.

I will try and get some use out of the car in the next few days while the weather holds, hopefully visiting the sprint series this weekend then it will be time for more little upgrades, I think I enjoy the practical side as much as the driving, perhaps once it's run in and I can do some track days it may be different.

Tuesday, 10 July 2012

Post Registration 6


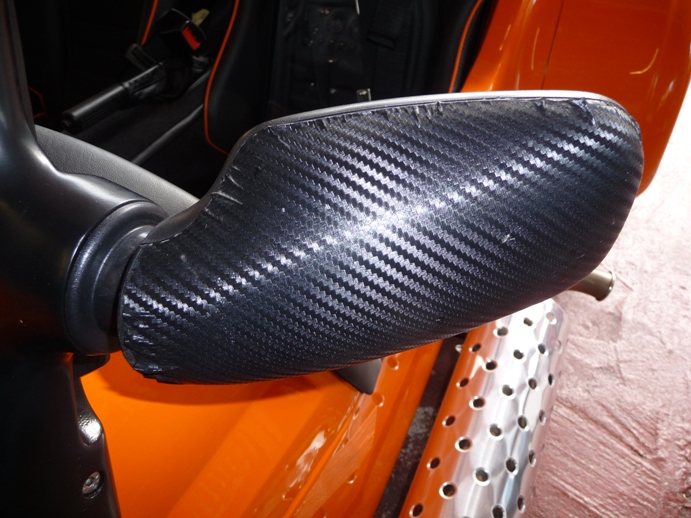
I haven't managed to get out in it much weather has been very poor indeed. Have been able to do a little work on it though. The carbon wrap on the mirrors started to look tatty almost immediately. I have purchased some proper 3M carbon wrap and also some 3M bonding solution. The new wrap is much better it feels thicker and hopefully it together with using the bonding agent should mean a better result that wont start to bubble and peal as soon as it sees the sun.

Before Re-wrap
After Re-wrap


I did go to work in it for the first time the other evening. I needed to do some work in the office later in the evening so knew the roads would be quiet, it had been a nice day and was still warm with no threat of rain until the early hours so decided to give it a run.
A cross city commute is not what it is best suited to, there are quite a few section of road with the speed bumps that allow you straddle them with a wheel on each side, great in my Focus but not so with the Westfield. Approached each batch very cautiously as they are all slightly different. Over almost all of them there was no issue but I did ground it a couple of time, very unnerving.
It also allowed me to see just how poor the lights are, I have ordered some HID conversions and while I'm at it some day time running lights. Once they're fitted I'll take it for another run in the dark so I can set them up for the best light coverage and spread.

Saturday, 30 June 2012

Post Registration 5

Its been a while now since the last post.

The car has been running well and have managed to get quite a few evening drives, there are some lovely roads around which when you time it right are great drives, when you get it wrong they can be very frustrating though stuck behind a slow moving car with miles of double white lines.

Running in is a bit frustrating, keeping it to 4000 revs is not easy and makes overtaking a little more difficult that it could be, not that its ever going to be easy. Sitting low and in the centre of the car makes seeing past cars more difficult so spotting the overtaking gap is more of a challenge.

It's had its first official engagement, acting as a wedding car to transport the Groom to church for a member of the extended family. The day started a little dull but I managed to go for a nice long drive before coming home to give it a wash and brush up.

It was quite entertaining to see my wife trying to get all glammed up for the wedding so I could drop her off at her sisters on the way to pick up the Groom. Its amazing the reaction the car gets in general but with the white ribbons on I even had a bus stop at a mini island to wave me on.


Apart from running in I have still managed to fiddle with the car and have a list of tasks to undertake. So far I have had another go at re-aligning the dipstick, it was far to difficult to get in and out so I have managed to reduce some of the angles and now it can be removed and inserted without too much difficulty.

The carbon wrap on the wing mirrors started to peal away almost immediately so I have got some proper 3M stuff plus managed to find a bonding agent to apply before and have re-done the drivers side mirror. Before I do the passengers I will give it some time to see it stays OK, but so far it looks much much better.


It's difficult to know where to store stuff in the car so I have fitted a map pocket in the passenger footwell. I have one for the drivers side but will see how the passenger one works for a while before fitting.

I have been doing some experiments to see what the actual tank capacity is, when the gauge reeds empty I've filled up a couple of times and each time get about 16 litres in. When I checked again with the factory they said the tank is 28 litres so I decided to check. I put 5 litres in a can in the boot and drove the car until I got symptoms of fuel starvation, I then put the 5 litres in a filled up as soon as possible afterwards, within 2 to 3 miles, I got just over 17 litres in meaning a total tank size of 22 litres, less than the 28 litres I was told.

It's now reached 500 miles so has had its first oil change, I ran the front wheels on to a couple of small ramps to give me some clearance under the sump and then jacked the rear up to make it level. I then checked the level on the dip stick and opened up the sump plug and let it drain while I had lunch.

Before putting oil back in (some inexpensive 10w40 semi synthetic)  I emptied the drained oil into some 2 litre pop bottles to get an idea on volume, I was told the capacity was 4.5 litres, but from what I put into the bottles it was closer to 3.5 litres, I expect the difference could be that I did not change the oil filter and that may not have drained fully. I'll do that at 1000 miles with its next oil change.

Only 1500 miles to go before its run in.

Thursday, 7 June 2012

Post Registration 4

Managed to pop to the petrol station between rain showers to fill up, the tank was registering empty but when I looked in through the cap I could see that there was some still showing at the bottom of the tank.
Filling for the first time was a little nerve racking, I suspected if I was not careful it would be easy to over fill and then there would be petrol every where. In the end it was not too bad I used a torch to keen an eye on the levels and of course with proper pumps they cut off. In the end I put in just over 16.25 litres (update correct amount entered, had read the sale cost not litres) with it just starting to fill the fill tube. (update This means the fuel gauge is far from accurate. I think I will sort out a fuel can to go behind the passenger seat and run it much lower, filling when only just under half empty will start to get troublesome).

later I managed to get another 35 mile run, this went well with no issues at all, the fuel gauge does not seem to have moved to much either.

When putting the car away I noticed that the back did not seem to be level, I checked the measurements and the wheel arch and at the lowered flow and it seems to be 1cm higher on one side than the other. As the suspension was set up by Westfield decided to let them have a look at this also. Though with the weather forecast I was not sure when I would be able to get to the factory.

Thankfully woke to a sunny morning so poped to the factory. They checked the oil leak and siad they thought it would be ok it was just suface grease and signs of bedding in, they advised I keep an eye on it and it it does not clear up to go back.

Next Mark had a look at the issue with one side looking higher than the other, he measured the shocks and from the chassis rails rather than the lowed floor, there was very little difference, he did say that during the running in period it could change and it would be worth keeping an eye on the suspension set up. The issue I have is not the suspension but the body work looks to have settled on one side more than the other and needs to be adjusted. This can be achieved by loosening the fixings to the aluminium bracket at the back and adjusting the levels.

I asked Mark about running in, I said that I was keeping it to 4000 revs which he said was ok, he advised that the longer the running in period the better and advised trying to keep the revs down for 2000 miles. He recommended an oil change at 500 miles and another at 1000 with the filter plus another oil and filter change at 2000 miles. For the first couple he said that cheap oil would be ok but for the 2000 change use a good quality fully synthetic oil. I guess running in is not going to be easy but it's not exactly slow keeping to 4000 revs and not using full throttle.

Just need some good weather so I can get some runs in plus plenty of money to keep adding fuel.

Sunday, 3 June 2012

Post Registration 3


Build time today 3.0 hours - Total build time 263.5 hours.
Man time today 3.0 hours - Total man time 292.5 hours.

Now to have a general look and check everything is tight or not to tight.

First got the car up on to axle stands to I could have a good look underneath. loosened off the wheel nuts first thought. I could immediately see where I had caught the seat mounting bolts, they would definitely need to be trimmed. Next a general look and check of all the nuts and bolts to make sure they were still tight. I soon spotted a few issues, there looked to be oil leaks from a couple of places, the engine drain plug, the oil catch tank drain plug and from the gearbox.

Found that the drain plugs on the engine and oil catch tank were not tight, guess I should have checked but I assumed the engine would have been tight. Gearbox is more worrying though but as the engine and gearbox come as a unit I think I will pop back to the factory to get them to have a look under warranty.

Everything else looked good and tight with no issues anywhere else visible

Next on to shortening the seat mount bolts. For each nut and bolt I removed the nut, added a washer and tightened back up, then I cut the excess thread off. Once cut off I removed the nut again, removed the additional washer and put the nut back on. This meant that I would have a washers worth of thread showing once complete. It these bottom out I am not quite sure what to do.

Before
After


Next to remove the boot liner, now that it's screwed in place an quick and easy job. Once removed I could see the fuel tank breather. Removing the passenger rear wheel allowed full access. I could then see that one of the cable ties was tighter than it ought. Decided to cut them all off. My initial though was to use some copper pipe cutoffs to stop the pipe compressing, but when looking at the pipe decided that it could cut the pipe so used some of the supplied ribbed cables protector instead. I then reattached being careful not to over-tighten.
With the liner out I also took the opportunity to lighten up the jubilee clips securing the filler, as I think these had leaked a little when I topped the tank up and filled it into the filler pipe.
Once done I put the boot inner back in.

While it was up on stands I thought it may be an appropriate time for the edging in the front cycle wings to fall off, so removed each wheel the edging and tape and then put the wheels back on.

As I was finishing one of Beckis friends arrived who had been following the build. Decided to take him for s spin to check all was OK. When I firsts started it up, it still did not sound right but though if it was related to the pinched breather pipe I would need to let it run for a while to check so went for a drive anyway, within a couple of hundred yards it sounded OK again and the strange noise did not return.

the fuel gauge is now reading empty so I need to go and fill it up to see how much I can get in. Checking with the factory they said the capacity is 28 litres, looking into the tank I can still see fuel so it will be interesting to see how much I can get in.

With the weather set to be poor for the weekend, I am not sure when I will get back out to see how its now running.

Post Registration 2


Managed to get a good drive, went over to Bridgenorth and back via a circular route, about 30 miles. Not totally smooth, but fun. When coasting to a halt the engine would cut out, it would start again so a little worrying. When I got back I wanted to look into the tank to see if I could see the fuel level. When removing the filler it seemed that there was a pressure difference between the tank and out side, which I suspect is not correct.

Popped out again a little later to drop Becki off at the pub, she wanted to show off my new car. On way home it started to make some strange noises, this was somewhat more worrying. Will need to give it a good check in the morning.

Wednesday, 30 May 2012

On The Road

After much waiting its finally on the road, Tracy has been popping home during her lunch to see if the registation and tax have arrived. It still hadn't arrived this lunchtime. I did get a call though when she got back from work. There was an anonymous looking brown envelope with a birmingham  post mark so she had a look, it contained my cover note, the original factory receipt, no registration doc, but lucking in the bottom was a Tax disk. She very kindly took the envelope too the local motor factors to try and get some number plates made. They said they really should have the reg doc, but agreed to make them based upon the info we had.

Tracy was then going to pop out so phoned to say she had left the number plates by the car. A short while later she phoned again to say that it was throwing it down. Just my luck I thought.

So I got home to some number plates and a Tax disk. I already had rivet nuts ready for the rear number plate. so I made a template out of cardboard and using a couple of the cut down rivets pushed into the rivet nut (I had previously used them to mark the scuttle) to mark the card board template allowing me to drill the number plate correctly. I also used rivet nuts on the front. Though not sure how long it will last as it is very vulnerable. I think I will end up with a stick on plate on the nose.

It has stopped raining and had dried up nicely but was a little threatening. So now for the first proper road legal drive, took tracy the long way to see her mom, then took her mom and dad for a spin. Back home for a bit of tea and then some more spins with various friends.

It is really very easy to drive, though at the moment I am being quite gentle with the revs and using 4000rpm as an upper limit, it still goes like stink though. I found its not to bad in the rain as long as you keep moving, initially the wipers work reasonably well but after a short while you need them on both sides of the screen.

it's now got about 85 miles on the clock, 50 from the IVA day and 35 this evening running people about, the weather looks bad tomorrow so it may not get an outing, but Friday looks ok and then I have a week off so hopefully I can get some miles done.

One job I need to look at though, it bottomed out a couple of times, initially it was very worrying as it felt like it came from the rear and I feared for the diff or something. After a while it dawned on me what the problem is, the seat mounting bolts have a couple of cm of thread showing and I think it was these that were catching, need to get the car up and the threads shortened. Not sure how yet but it will come to me.

Looking forward to a long hot summer.

Tuesday, 29 May 2012

Post Registration 1


Build time today 1.0 hours - Total build time 260.5 hours.
Man time today 1.0 hours - Total man time 289.5 hours.


Popped into the factory to see if they could swap the flawed wind deflector, luckily they had just had a new batch delivered. Simple swap.

I asked about how they recommended protecting the body work, while looking at the car in the show room and it's wind deflectors, even though they looked identical they weren't supplied by Westfield. The recommendation is to either use edging along the bottom edge or a rivit-on grommet positioned correctly. They let me have a length of edging and a couple of grommets. 

When I got home I completed the fitting of the drivers side deflector, having already worked out how I would fit it did not take long. At the moment I have used edging along the bottom to protect the body work, plus I have put some orange duct tape on the body. I plan to use the grommet long term but want to be sure of its positioning first.

One thing I have been advised to do is to align the windscreen uprights with doors, just in case I have doors in the future. Once the registation has come through I will try and pop up to the factory tomorrow the doors off their demonstrator to adjust the windscreen.  Once this is done and with a bit of driving I should be able to position the grommet, plus get accurate measurements to order a half hood, when they start making them again. 


Wednesday, 23 May 2012

Registration/Build Day 89


Build time today 1.0 hours - Total build time 259.5 hours.
Man time today 1.0 hours - Total man time 288.5 hours.

Got the Registration process under way, it was more stress full than the IVA test. Took the trip across Birmingham yesterday trouble was I had not fully read the V55/4 guide and only had my old paper license and no other proof of ID. Wast of an hour.

Went again today, I was told, even though I had a certificate of newness from Westfield I still needed to fill another form in V627/1 (Built Up Vehicle Inspection Report). I have just searched for the form and found another PDF "Guidelines on how you can register kit cars and rebuilt or radically altered vehicles" this also mentions SVA so I think refers to old legislation and if you follow the link back "www.direct.gov.uk/vehiclereg" the information is different and as I expected. If you follow the links to "Registering a kit built vehicle"


Documents needed to register your kit built car or motorcycle
To register your kit built car or motorcycle you will need:

  • official receipts for the vehicle and any components used
  • build plans for the vehicle
  • correct vehicle tax (where appropriate)
  • £55 registration fee (if required)
  • a certificate of newness
  • from V55/4 – application for a licence for a new motor vehicle and declaration for registration
  • insurance certificate
  • documentation confirming your name and address
  • individual Vehicle Approval (IVA) or Motorcycle Single Vehicle Approval (MSVA)

If the vehicle cannot pass IVA or MSVA it cannot be registered.

No mention of inspections or V627/1. Had I know I would have printed the relevant page from the DirectGov website.

Finally having filled in forms, produced documents, visited different counters, paid money (£275, £55 first reg fee and £220 for Tax) they said that as it was a self build it could not be completed today and the documents and Tax would be sent out in the post. 

Tremendous, why the differentiation between factory assembled and self build kits, the IVA inspector said that I had built the car to a higher standard than the factory.   Its about time they got their processes in order.

travelling back to work I ended up sitting in a traffic jam for half and hour, car broken down just as two lanes merged in to one for road works.

When I got home I thought I would have a go at fitting the wind deflectors, I had checked with the factory and they have not real guidance apart from make sure I use something to protect the car body where the deflector touches. As a temporary measure I used some the edging that had just fallen of the rear of the front  cycle wings. It is not actually the correct size so I will need to order some. I used a couple of small clamps to hold the deflector on to the top brackets to get the alignment started. In the end I decided that the appropriate seemed to be to get the lowest crease in the deflector in line with the top edge of the side body panel. then it was a matter of marking, drilling and fitting the brackets, I only pealed enough of the protective cover to allow the supports to be attached until all was complete.
It does not show up very well in the picture which is good for visibility.


When I pealed the film of the drivers side I could see it was flawed with a number of lines in it. Will have to contact the factory to get a replacement.

Just need to wait for the post man, hope he comes soon , it will probably be raining. 


Monday, 21 May 2012

Build Day 88/IVA Update part two


Build time today 1.5 hours - Total build time 258.5 hours.
Man time today 1.5 hours - Total man time 287.5 hours.


Passed, took 10 seconds for the retest. That's almost £10 a second. 

Oli had been back to college so managed to pick him up on the way and over to VOSA for 16:15. Passed, handed over more money and got my certificate. I spoke to Mark at Westfield and he sorted out a Certificate of newness to go with the DVLA V55 and IVA pass certificate. Only a slight de-tour to pick it up and very nice of them to wait for me to arrive. 

Started my Post IVA work, first I had a look at fitting the wind deflectors, so removed the IVA protective covers from the mount points then got the brackets out to try. Would not fit the holes need to be enlarged slightly up to 5mm. it was not that easy to get a drill at the bottom mount points but managed using a flexible drill attachment, mounting brackets now fit just right. Not quite sure how they line up though, I think I do but I think better to check before drilling holes in the wrong location. 

I then removed the temporary edge cover from the Roll bar and fitted my Tax disk holder

Edging that got me through
Tax disk holder - ready and waiting


To finish the day I removed the large number plate holder ready for a smaller one to be fitted.

Hopefully I can get away lunch time to get to the DVLA office so I can part with more money.


Build Day 88/IVA Update


Build time today 2.0 hours - Total build time 257.0 hours.
Man time today 2.0 hours - Total man time 286.0 hours.

IVA not quite there yet. 

I travelled with Oli with Becki following a little later with a box of tools etc.

First time I have driven on the road
I knew I had one issue on the way, the speedo was way out based upon the SAT Nav, tester said one of the first tests was the speed, I explained that I knew it was out and that my daughter was following in a while with a box of tools and she also had the instructions for setting the speedo. He explained how they were test the calibration and then we hit the first snag, as the measure is on the front they have no way of accurately measuring. Oh my god, emotions overload, frustation, anger, wonderment. Straight on the phone to Westfield, passed Mark over to the tester Keith and it looked like there may be a way forward, they would fax of a doc which should cover it.

From this point it went better, opened the bonnet and he complemented me on the quality of the build. On to the various tests, emissions ok, projetions looking ok, until he came to the RAC Rollover bar. it failed, said there were some sharp edges that need to be covered. Back on the phone and Mark explained what was needed. A little bit of edging on the edges, trouble was I had no spare, it had all been used, he was very helpful though and pointed out some edging that could be removed without it being an IVA issue. I loosened the top nut an bolt and then used the washer to pinch the edging to hold in place, not elegant, but he said that from the quality of the build he knew I would sort it properly. So a pass on projections.

Next on to the brakes all looked ok.

Right tests the lights, first issue was the passenger side light was not coming on. A quick check and it turned out to be a loose connection so sorted. Now the rear lights. Issue, interference between indicator an stop tail on the passenger side.  Probably an earth issue and I could have a look while on the ramps.

Mirrors, noise and steering all ok.

Up on to the ramp. More complimentary comments, "better put together than a factory car", then spotted another minor issue. The bolts attaching the hand brake were not quite long enough the nylock nut was not catching well enough. If this was the only issue I could have resolved one way or another on site. I had a bag of various nuts and bolts, plus there was a Screwfix opposite so I'm sure it could have been resolved, but with the electrical issue I decided to leave it. I had look at the tail lamp wiring but there was nothing obvious. 

So almost but not quite. I said I would get it sorted as soon as I got home, He said if I could get back in time he would check it again (as a retest) and he finished at 16:30. 

Off home, nice drive back, not as nice as it could have been and straight into the garage. Speedo was now spot on based upon the sat nav. Weather is lovely, just the sort of day for this type of car, almost worth the couple of weeks wait to be able to got to the test on a day like this.

First I removed the boot liner. It was riveted in so I had to drill the rivets out, this let me get a the tail wiring much easier. I had already decided I would remove the boot at some point to replace the rivets with rivet nuts. 

Then to cut the sheathing from the wiring, in the end I worked out I had got the indicator wires the wrong way round so the indicator live was feeding the tail and stop lamp earths. A stupid mistake and I am not sure how I missed it as I am sure I had tested and looked at the lights. Morale is check, check and check again, then get someone to help you check. Re testing was not easy by my self, I ended up finding a long length or wood to press the brake pedel while stood behind the car.

Next up to Westfield to get a couple of longer screws, then a quick job to swap the bolts for the longer one. Boot is now back in place secured with rivet nuts so it can be removed when needed.

Left a message for Keith at VSOA but all being well it should get a pass later. Just finishing my lunch, which I started when I got back from the test center.

Monday, 23 April 2012

Build Update

Finally got a call from the local VOSA centre with a IVA test date, Monday 21st May.  Seems a long time away, wish I had got the papers in earlier.

Saturday, 21 April 2012

Build Day 87


Build time today 1.5 hours - Total build time 255.0 hours.
Man time today 1.5 hours - Total man time 284.0 hours.

Last Pre IVA task completed. I had been warned that the RAC roll bar covers could fail on the sharp edge run so have edged them. Don't think they look as good now so will need to decided what to do for a long term solution.

I had also noticed when sitting in the car that my clutch foot was fouling the carpet when lifting it off the clutch. I had put the Velcro strips across the opt and bottom of the carpet in the foot-well on the drivers side and had forgotten to add a length down the forward edge. It was more fiddly in the confined space I managed to put an extra piece in and it's no longer an issue.

Just need a test date to come through, starting to get really worried that the date will be ages away, I should not have followed the advise from Westfield to wait until it was complete before putting my application in I could easily have entered it a couple of weeks earlier and still had time to sort out any remaining issues.

Monday, 16 April 2012

Build Day 86


Build time today 2.0 hours - Total build time 253.5 hours.
Man time today 2.0 hours - Total man time 282.5 hours.

Fuel leak sorted at last, checked it several times over the last couple of days, each time tightening a little more. It looked like the issue was the brass fitting that screws into the tank was not quite tight enough. Once installed it is not particularly easy to get to so difficult to judge the tightness, rather than just trying to tighten up with the chance of sheering the fitting I used the approach of a little at a time until there was not leak and then just a little more for good measure.

The electrical tape I used to secure the cycle wing edging was not holding and kept peeling off so I purchased to duct tape off eBay. I have now used strips of this to secure the edging and it seems to be doing the job.

I also used some on the side screen brackets to help secure the covers in place.


With these tasks done I could drop the car down off its stands and drive it out of the garage into the sun.
There are a couple more tasks that need to be done before the IVA.


First I had another look at the front flexible brake pipe routing. I tried twisting the pipes to get them to run away from the body or suspension but could not so decided to use so protective ducting and secure to top wishbone, checking there is still enough slack plus not over tightening the cable tie securing in place.  (post IVA comment, inspector commented on the this arrangement saying it was better than the factory solution, they nearly always have to adjust the brake pipe routing during the test)


I then trimmed the bonnet catch covers so that fitted better, in their supplied from there is quite an excess of plastic and my worry was this would apply outwards pressure on the catch possibly allowing it to open.

In there trimmed from they fit much better and the catches feel secure.

Last job I need to tackle is to fit some edging around the RAC Roll bar covers, order from eBay.

I sent the forms off for the IVA over a week ago, they were very quick to phone and get payment but seem to be taking there time with an appointment.


I spent quite a while tidying up the garage, putting tools away and assembling the tools and bits and bobs I think I need to take on the IVA test. As I plan to drive and Oli wants to comer I will have to work out where I am going to put everything.

Wednesday, 11 April 2012

Build Day 85


Build time today 1.5 hours - Total build time 251.5 hours.
Man time today 1.5 hours - Total man time 280.5 hours.

Looks like some progress, no leaks from brake master cylinder area or coolant system. Checked fuel system and there is still a minor leak tightened a little more. I don't want to risk over tightening and snapping something off, easily done in a difficult to reach confined area. I have checked a couple of times since tightening and so far so good.

Then spent some time with the Auto Gym polish making sure I have given all of the body work a coat.

Will check the fuel leak again tomorrow, fingers crossed.

Build Day 84


Build time today 2.0 hours - Total build time 250.0 hours.
Man time today 2.0 hours - Total man time 279.0 hours.

I had dropped an email asking for a couple of clarifications and had some of the needed info.

One thing was not to use cable ties on the side screen mounts as these could have sharp edges. I have replaced them with M5 screws and will add some black duct tape. 

Still not sure how to best protect the flexible brake pipes without securing in place some how, will get further clarification, I did spot a comment on the WSCC forum that it was ok if the flexible pipes touched as long as they were covered and protected.

I ran the engine again for a short while to check the coolant system and all now looks ok. I will check and check again before the IVA test though.

checked the brake master cylinder and that too looks to be now sorted, but will keep an eye on it.

Now to check the fuel leak, I expected that to be OK but it was not, there was the slightest amount in a part formed droplet, but it is difficult to really tell where it is coming from. The only thing is to again tighten everything slightly and keep checking. I may need to drain the tank again and dissemble the fuel tank connections to check those, regardless of IVA this needs to be sorted.

The only things left to do are keep checking for leaks. fit the bonnet covers, decide what to do about the flexible brake pipes and RAC roll bar covers.

Build Day 81-83


Build time today 7.0 hours - Total build time 248.0 hours.
Man time today 7.0 hours - Total man time 277.0 hours.

Its back from Westfield, they actually drove it back on trade plates. Said that it was well built. I have a list of minor rectification and pre-IVA tasks to complete. Nothing major. 

Some wiring needed to be tidied up
  • Tidy up wiring 
    • in the engine bay, specifically the air temp sensor and fuel injection related wiring
    • by the diff needs more securing
    • wiring to rear lights and number plate
    • under the dash
  • alter the route of the flexible brake lines at the front
  • fit rubber edging to CPU panel
  • fit rubber edging to cycle wings
  • move exhaust cover so that it covers the mounting clamp
  • fit IVA nut covers around front suspension and RAC Roll bar.
  • fit IVA bonnet catch covers
  • fit IVA side screen covers
  • look at slight brake fluid leak around master cylinder
  • look at slight petrol leak around fuel tank outlet
  • check to see if the plates I have used to cover the Roll Bar mounts will comply with IVA test.
Nothing major and if the guide was better things that may well have been done.

moving the exhaust cover was quick and easy, just loosened the securing straps and moved it back until it covered the mount.


To adjust the brake pipes I loosened the securing nut and twisted until they no longer touched any body work or suspension components. I am still not happy though as when steering is applied they do then touch body work or suspension components. I need to seek further clarification and wondered if it was OK to cover the flexible pipe and fasten to the upper wishbone.


With the engine bay wiring, I removed the air filter tube from the throttle body and rerouted and re-secured the wires. I used spiral wrap on the injection wires to keep them together. Again had I known more about how wires need to be routed I would probably have routed a number of wires differently.

To get at the rear wires I jacked the rear up and placed on axle stands as high as possible. To even it out I also lifted the front on to stands as the front wheels would need to come off to look at the cycle wing edging.

With the bodywork and wires in place I could see where they needed to be tidied and secured.  With the wires around the diff I spiral wrapped them as best as I could and secured with a cable tie. At this point there was no way of attaching a cable tie securing point. I did add some additional riveted securing points where I could get access with a drill and riveter, underside of rear uprights, and a point to add an additional securing point for the tank earth.  Something I already knew I needed to look at again, it looks a lot neater now with the wires held securely in place, hopefully the IVA inspector will be satisfied.


While under the rear I had a look at the fuel leak. Indeed there was a small leak, I was told that I would probably just need to relocate the jubilee clip slightly, so I loosened it and move it as recommended, while doing it there was a bigger leak and even when complete it did not rectify the situation. Only thing to do was to drain the system and look to re-assemble. I got a petrol can and some empty containers then clamped the pipe.  To drain I disconnected the pipe from the fuel pump to allow me to direct the flow better. Once the tank was drained I took the pipe off completely checked where the clips needed to be to make sure they gripped correctly and reassembled and added some fuel. Still a slight leek, so it is a matter of keep tightening a little at a time until it stops, well I hope that is the case because I am still lightening what feel to be tight fittings already.

Next to look at he leak from the brake master cylinder area, on first inspection it looks there is a very slight leak from the brake pressure sensor, so a tweak with a spanner to tighten it up, checked again later and it feels like there is still a slight leek, trouble is it is not easy to get at all the bits and the leak is only very slight, I  carefully clean the area as best as I can so I can come back later. When I rechecked it felt like it was coming from one of the master cylinder outlets. Another tweak and  all now seems to be OK.

On to the cycle wing edging, I had been advised to use electrical tape to secure the inner edge of the edging as it can easily come off. so this is what I have done. Once the edging was in place I used black electrical tape to secure the inner edge, I have ordered some black duct tape to replace the electrical tape as it is not holding. the real problem areas are around the lower read edges. Hopefully some better tape will do the job.


With the cycle wings done there was just enough of the edging for the CPU panel. Simply dropped the CPU panel down and applied some electrical tape. (I suspect I will need to replace the tape though).

Next on to the nut covers, quick look through the pack and I can see I have different sorts. I knew I had some supplied with the RAC Roll Bar so first to pick these back out. They fit nice and tight. Now on to the suspension. Not so straight forward with these, I suspect they don't all need to be covered as most are actually difficult to get out, decided to cover all those that I could within reason. Some did not fit very well, with these I wrapped a little tape around the nut to increase the diameter a little and applied a little silicon to the end to help secure in place. I'll take the spares with me when I have the test.

Now for the side screen covers, these were really tricky as they are all either a tight fit or an extremely tight fit. If you push them on they just pop off again. I tried a couple of different solutions, first electrical tape, sort of worked for the first, but the second which was tighter would not hold it. I then tried to use an m5 screw as this fitted in the hole ok, but eventually used small cable ties, not sure though.

The bonnet catch covers I will leave until I no longer want or need to open the bonnet.

Now on to the dash, I had been given some advice on getting the wheel off. Loosen the nut but don't fully remove, then bang on either side of the wheel and pull on either side of the wheel and it will come loose. After a while it worked. With the wheel off I could unscrew the dash and re-arrange the wires, using cable ties to secure loose wires into groups and making sure that all the wires followed the main loom.  With the dash off I also took the opportunity to fit a power take off point, splicing into the switched live and earth feeds for the immobilizer circuit. I should have taken time to create the mounting before fitting the carpet because getting it off with the seats fitted is not possible and it makes fitting rivet nuts quite tricky. I did manage it though. I won't wont have to rely on my Sat Nav battery now when I go for the IVA test. If I go to Derby the Sat Nav will be needed to aid in getting there but for either destination it will be usful to asses the speedo accuracy.

I have looked at the regulations again and the Roll bar cover plates and I am unsure, I may just remove them. Depending upon how long I have I could look at the supplied ones, or I may come up with another solution.

Before finishing I did a final check on the brake leek, not sure, think its now ok, but while looking noticed a couple of small puddles under the other side of the car. I had run the engine for a little and I found I had a small coolant leak. So tightened up the jubilee clips a little more.


Tuesday, 10 April 2012

Build Update

The Car has been picked up by Westfield to check it out before the IVA check.
They will set up the suspension, steering, re-bleed the brakes and give it a good pre IVA inspection.

Knowing that it is now getting close and hearing that there could be quite a wait I have also sent the forms off to get the IVA booked. giving them a couple of test stations. I have one about 10 miles away along a lovely country a road. The other is about 50 miles away with a route largely through cities and towns. It is not so much the distance but the journey that is off putting but if I can get a test sooner it will be worth it.

Friday, 6 April 2012

Build Day 80


Build time today 6.0 hours - Total build time 241.0 hours.
Man time today 7.5 hours - Total man time 270.0 hours.

Reached a point where it is sort of complete though there are things to complete or improve.

First task was to jack up the rear so that I could fit the fuel tank earth and get the rear wheels off.

The Earth tank was a little tricky, working upside down in a confined space, it would have been helpful if the guide had said to do this rather than picking it up from the IVA manual. there is a M6 mount point on the bottom passenger corner of the tank so I made up a length of cable with ring connectors and connected one end to this and the other to one of the fixings holding the rear body work support.

With that done I used silicon to fill up any holes between the mud catchers and the bodywork, these prevent (hopefully) ingress from the rear arches down the sides between the body work and the aluminium panels. A messy job that used a fair bit of silicon.

Now to attach the VIN plate, decided to fit to the scuttle approx where the wiper motor is fixed, lined it up with masking tape and riveted in place.

Next the IVA compliant number plate holder. I used rivet nuts into the bodywork and then tried to measure where to drill the holes in the plate to correspond. Eventually got it fastened, I tried to put spacers between the plate and body work but gave up in the end.

The wires from fitting the repeat indicators were still loose so I spent a little time securing them in place.

Now on to the last task for the day, fitting the pedal cover. I realized it needed to be trimmed so cut it to size and fitted it. I used rivet nuts in the chassis and body work to secure and applied a small bead of silicon to stop water ingress.

It was now sort of complete, it was going back to the factory to get a check over, the suspension set-up and an IVA assessment, I know various things that need to be done for the IVA but there is no rear guidance in the manual. Some of the IVA bits I an not sure about.

To finish for the day I added more fuel and tried to run it for a while. The engine seemed to settle down once it started to warm up.


Wednesday, 4 April 2012

Build Day 79


Build time today 6.0 hours - Total build time 235.0 hours.
Man time today 8.0 hours - Total man time 262.5 hours.

First task once I had returned the tap to Westfield was to complete the carpet fitting. Getting the driver foot well carpet in place was a little tricky as it is slightly too long to finish in front of the pedal mounts, I had to push the floor down a little to allow it to slide slightly under them. Once that was done it was a simple process to get the other carpets in place and make the holes for the seats. Then on to fitting the drivers harness, having tapped the holes the bolts went in without too much effort.

Before fitting the seats I decided it was sensible to drill the holes to fit the dash. First I had to find the pre-drilled holes in the dash. Starting in the centre I used a small Philips screwdriver to prod the back edge of the dash to locate all the mounting holes, marking them as I went. Once done I used a 4mm drill to clear the hole. I them located the dash making sure it was in the correct location before marking the fixing points for rivet nuts.

Next task was to fit the seats, passenger first, this was the seat we had tried previously and it went in without issue, A little silicon on the large washers under the floor and tightened up the nuts. Driver's next, off with the polythene and bauble wrap, only issue was a missing washer and nut, never mind easy to sort out later.

With the seats in place I re-attached the upper harness mount points through the seats and included the IVA compliant covers.
Quick test and on to the dash.

I first looked at the sequence the connector blocks were on the loom then amended the switch order to be the same. I though best to start like this even if I change at a latter date.

I had spent some time looking at the speedometer and tachometer connections, I had previously made some notes, I only need to find them. The harness as supplied is for VDO clocks and the ones fitted aren't VDO so I needed to add some adapters, or add spades etc, most of which were supplied. The tricky part was the  speedometer , where you have connectors on the speedometer plus wires coming out of the back of the  speedometer , the harness and the feed from the speed sensor. It was a matter of carefully matching the connections, checking you had it correct and checking again. Then on to the Tachometer, this was more straightforward and then the switches and other gauges, again more not difficult it was just a matter of finding the appropriate connector to match the wire colour on the harness.
A lot of spaghetti and something I am sure I can tied up further.

With the dash in place I next had a go a setting the speed calibration, I had obtained the correct setting from Westfield (hope it is correct anyway) and it was a matter of following the instructions, after a couple of attempts I entered what I hope to be the correct value,

With the dash wiring complete it was then onto securing it and sorting out the cover. This is fixed with Velcro so a matter of applying to the full length of both surfaces and putting in place.

Steering wheel came next, getting all the screws, washers and nuts on was not easy as I would have expected, it was though there is a slight warp in the steering mount, the wheel is ok and eventually it was secured and attached. I guess the wheel is not expensive and something to be replace with a better quality item in the not too distant future.

With it nearing completing I took it for a little drive (little being the operative word) with only the drive to manoeuvre on. though I did manage to leave a couple of nice black lines much to Oli's amusement. With it running I checked the various switches and instruments again. All seemed ok except for the headlights which worked on side lights but the right lights then dimmed when the main lights were activated. Bother (not the actual word used).

last little job for the day was to put the rear view mirror in place.